We’ve all been there – staring intently at our computer screen, desperately trying to locate the mouse cursor that seems to have vanished into the digital abyss. This frustrating experience is even more common on cluttered screens or for users with visual impairments.
But fear not; there’s a simple solution to permanently banish cursor camouflage: add a mouse highlighter. This visual aid makes your cursor impossible to miss, improving visibility, enhancing presentations, and even enhancing accessibility.
This guide will walk you through two effective methods for adding a highlighter to your mouse pointer in Windows 10 so you can navigate your digital world with ease.
Table of Contents: hide
Method 1: Embracing the Built-in Windows 10 Mouse Settings
Method 1: Embracing the Built-in Windows 10 Mouse Settings
You can solve simple problems without fancy software. Windows 10 has built-in settings to customize your mouse pointer, including size and color.
Here’s how to unleash your cursor’s inner glow:
Step 1: Dive into Mouse Settings
Open the “Settings” app (you can quickly find it using the Windows search bar), then navigate to “Devices” > “Mouse.”

Dive into Mouse Settings
Step 2: Unlock Advanced Options
Under “Related Settings,” click on “Additional Mouse Options. This will open the classic Mouse Properties window.
Unlock Advanced Options
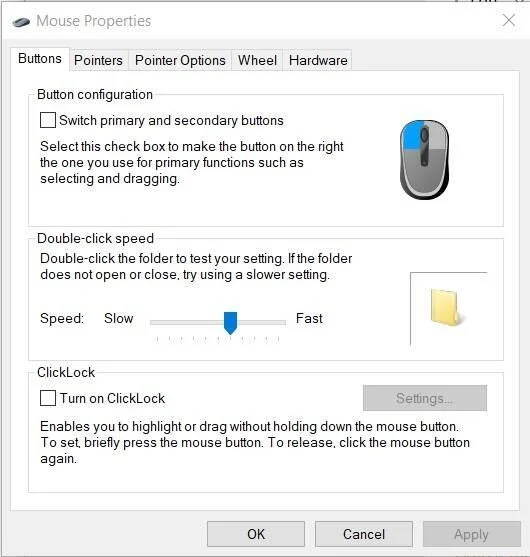
Step 3: Enter the “Pointers Options” Tab
In the Mouse Properties window, select the “Pointers” tab. Here, you’ll find a wealth of customization options for your mouse pointer.
Enter the “Pointer Options” Tab
Step 4: Choose Your Weapon (or Customize)
Windows 10 offers pre-designed pointer schemes that you can select from the drop-down menu. Alternatively, get creative and customize individual pointers by selecting a pointer and clicking “Browse.”
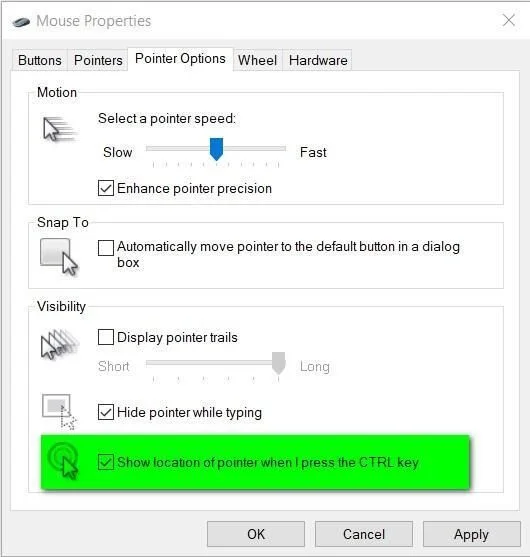
Step 5: Go Big and Bold
For maximum visibility, choose a larger pointer size and a bright, contrasting color. Try different options to find what works best for you.
Pro Tip: If you frequently switch between tasks that require different cursor styles (like browsing and gaming), consider creating multiple pointer schemes and switching between them as needed.
Method 2: Level Up with FocuSee’s Mouse Highlighter Feature
While Windows 10’s built-in settings provide a solid foundation, FocuSee takes mouse highlighting to the next level. This powerful screen recording software also boasts a dedicated mouse highlighter with customization options.
Here’s why FocuSee’s mouse highlighter shines:
- Customization Galore: Choose from a variety of highlighter shapes, sizes, and colors to perfectly match your preferences and needs.
- Spotlight Effect: Make your cursor the center of attention with a dynamic spotlight effect that follows its every move. This is particularly useful for presentations or online demonstrations.
- Keystroke Visualizations: Take your presentations by visually displaying keystrokes on screen, making it easier for your audience to follow along.
Using FocuSee’s Mouse Highlighter:
Step 1: Download and Install FocuSee
Step 1: Download and install FocuSee, launch it, and select a recording mode as you need.
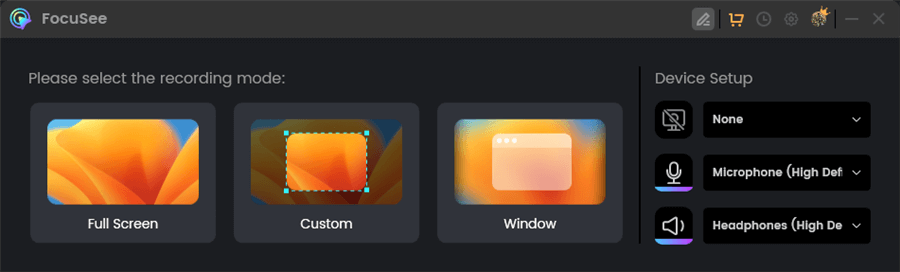
Choose the Custom Recording Mode
Step 2: Explore the Mouse Highlighter Settings
Once installed, launch FocuSee and navigate to the Mouse Highlighter Settings. Here, you can customize the highlighter’s shape, size, color, and animation effects.
Mouse Cursor Settings
Step 3: Enable and Enjoy
Enable the mouse highlighter feature, and you’re good to go! Your newly enhanced cursor will now be impossible to miss.
Tips for Choosing the Perfect Highlighter Settings
These tips will help you choose the most effective highlighter settings, whether you’re using Windows’ built-in options or a third-party tool like FocuSee.
- Prioritize Contrast: The goal is to make your cursor stand out. Opt for a highlighter color that contrasts sharply with the background colors you typically use. For example, a bright yellow highlighter works well on a dark background, while a vibrant blue might be better suited for a lighter one.
- Find the Right Size: A larger highlighter is generally more visible, but it can also be distracting. Try different sizes to find the sweet spot that balances visibility with a comfortable viewing experience.
- Don’t Overdo Animations: If you’re using software with animation effects, opt for subtle animations that enhance visibility without being overwhelming or distracting. A gentle pulsing effect or a subtle trail can be helpful, while overly flashy animations can be counterproductive.
Conclusion
Adding a mouse highlighter is a simple yet effective way to enhance your computing experience. Whether you’re giving presentations, struggling with visual accessibility, or fed up with losing track of your cursor, these techniques will make your digital life smoother and more enjoyable. So, say goodbye to cursor frustration and hello to effortless navigation!
The post How to Add a Mouse Highlighter in Windows 10 appeared first on Gemoo.